
Set Up a Station Board Wall Display
Command Established can turn a department dashboard into a full-screen station board for a television, monitor, or watch-desk display. Each screen uses the normal dashboard, so you can choose the widgets that matter at that station while keeping the display connected to live department data.
A Station Board is an authenticated dashboard, not a public share link. We recommend a dedicated, read-only member account for each physical display.
For a product overview, see Fire Station Dashboard & Station Board Display Software.
What the Station Board Can Show
Build each board from the same widgets available on the department dashboard. Useful wall-display widgets include:
- Weather — current conditions, hourly forecast, active alerts, and optional live precipitation radar.
- Announcements — recent department announcements from Log Books.
- Expiring certifications — department-wide expirations with overdue and due-soon indicators.
- Recent incidents — the latest calls across the department.
- Upcoming training — the next department training sessions.
- Upcoming events — everything on the department calendar over the next few days, grouped by day. See Showing Upcoming Events.
- On-duty personnel — today's active schedule and assignments.
- Apparatus tests — upcoming and overdue pump or aerial tests.
- Rig check-offs — the latest apparatus check-off status.
- Inventory compliance — department-wide inspection, maintenance, and certification status.
Module-backed widgets appear only when their owning module is enabled. Every widget also requires the display account to read its underlying information.
1. Create a Dedicated Display Account
Create or invite a separate member for the physical screen instead of leaving a chief or firefighter signed in on an unattended television.
A useful naming pattern is:
Station 1 Operations DisplayStation 2 Readiness DisplayWatch Desk Display
Give the account the Member role and only the read permissions required by its widgets. A typical station display may need:
- Read access on Incidents, Personnel, Training, Apparatus, Stations, Inventory, and Log Entries
Do not grant create, update, or archive permissions to an unattended screen.
See Understanding Permissions & Groups for help assigning roles and permissions.
2. Sign In on the Display
Open Command Established in the television's browser or in a small computer connected to the display. Sign in with the dedicated account and open the department dashboard.
For a more app-like installation, follow Install as an App. A browser or installed web app both support Display mode.
Keep the device in a staff-only area and use the device's normal screen-lock and operating-system security. The display contains department information according to the account's permissions.
3. Build the Dashboard Layout
Each display account saves its own dashboard layout, so two station screens can show completely different boards.
- Open the Dashboard.
- Select the edit button in the lower-right corner.
- Select Add widget.
- Add the operational widgets for that screen.
- Resize and arrange the widgets.
- Select Save.
Example: Operations Board
An operations-focused screen might use:
- Weather with live radar
- Announcements
- Recent incidents
- Upcoming events
- Apparatus tests
This layout works well with auto-scroll when the widgets extend below the visible screen.
Example: Readiness Board
A readiness-focused screen might use:
- Weather without radar
- Expiring certifications
- On-duty personnel
- Apparatus tests
- Rig check-offs
- Inventory compliance
- Upcoming training
Use smaller widget sizes and two balanced rows when you want the full board visible without scrolling.
Showing Upcoming Events
The Upcoming events widget reads the same department calendar that members see on the Calendar page, so a display shows the same items members already schedule there. Rows are grouped under Today, Tomorrow, and then the weekday and date (for example, Wed, Aug 26), with the start time or All day on the right. Each row carries the calendar's colored layer letter, so a training session on the board looks like a training session on the calendar.
The widget shows up to eight rows and reports any overflow as +N more coming up. When the window is quiet it reads Nothing scheduled.
While editing the dashboard, select Configure on the widget to change:
- Look ahead — Next 7, 14, 30, or 60 days. The default is 14 days, counted from today in the department's time zone. The window rolls forward on its own, so a permanently mounted screen stays current.
- Include — which calendar layers appear. The default is Events, Training, and CRR Events. You can also add the due-date layers: Work Orders, SOP Reviews, Pre-Plan Reviews, Inventory Due, Apparatus Due, and Hydrant Due. Select Clear to include every layer the department has.
Layers are gated by module, not by the widget. A layer whose module is disabled (for example, CRR or Pre-Plans) is simply never queried, so the widget stays useful for a department that runs only one or two of the calendar's sources. Unlike most module-backed widgets, Upcoming events always appears in the widget picker.
Selecting a row opens the underlying event, training session, or record. That is only useful outside Display mode, and the display account needs read access to that record to open it.
4. Turn On Display Mode
While editing the dashboard:
- Select Display mode in the edit toolbar.
- Turn on Show display mode button.
- Optionally turn on Auto-scroll.
- Select Save.
A Display mode button now appears beside the dashboard edit button. Select it to enter the wall-display presentation.
Display mode:
- Uses the full screen and hides normal application navigation.
- Switches to a dark, high-contrast presentation.
- Enlarges dashboard text and controls for across-the-room readability.
- Keeps the dashboard's saved widget layout.
- Requests browser fullscreen when the device supports it.
Press Escape or use the exit button in the lower-right corner to leave Display mode.
Using Auto-Scroll
Auto-scroll slowly moves through dashboards that are taller than the screen. At the bottom, it pauses briefly and returns to the top.
Mouse movement, scrolling, touch, or keyboard interaction temporarily pauses the motion. It resumes after the display is idle. If all widgets already fit on the screen, there is nothing to scroll and the board remains stationary.
Active-Incident Alerts
When the department has an active response, an incident alert appears above the dashboard widgets. It can show:
- Incident type and address
- Current response stage
- Turnout timer
- Assigned units
- Responding personnel
- Driving route map
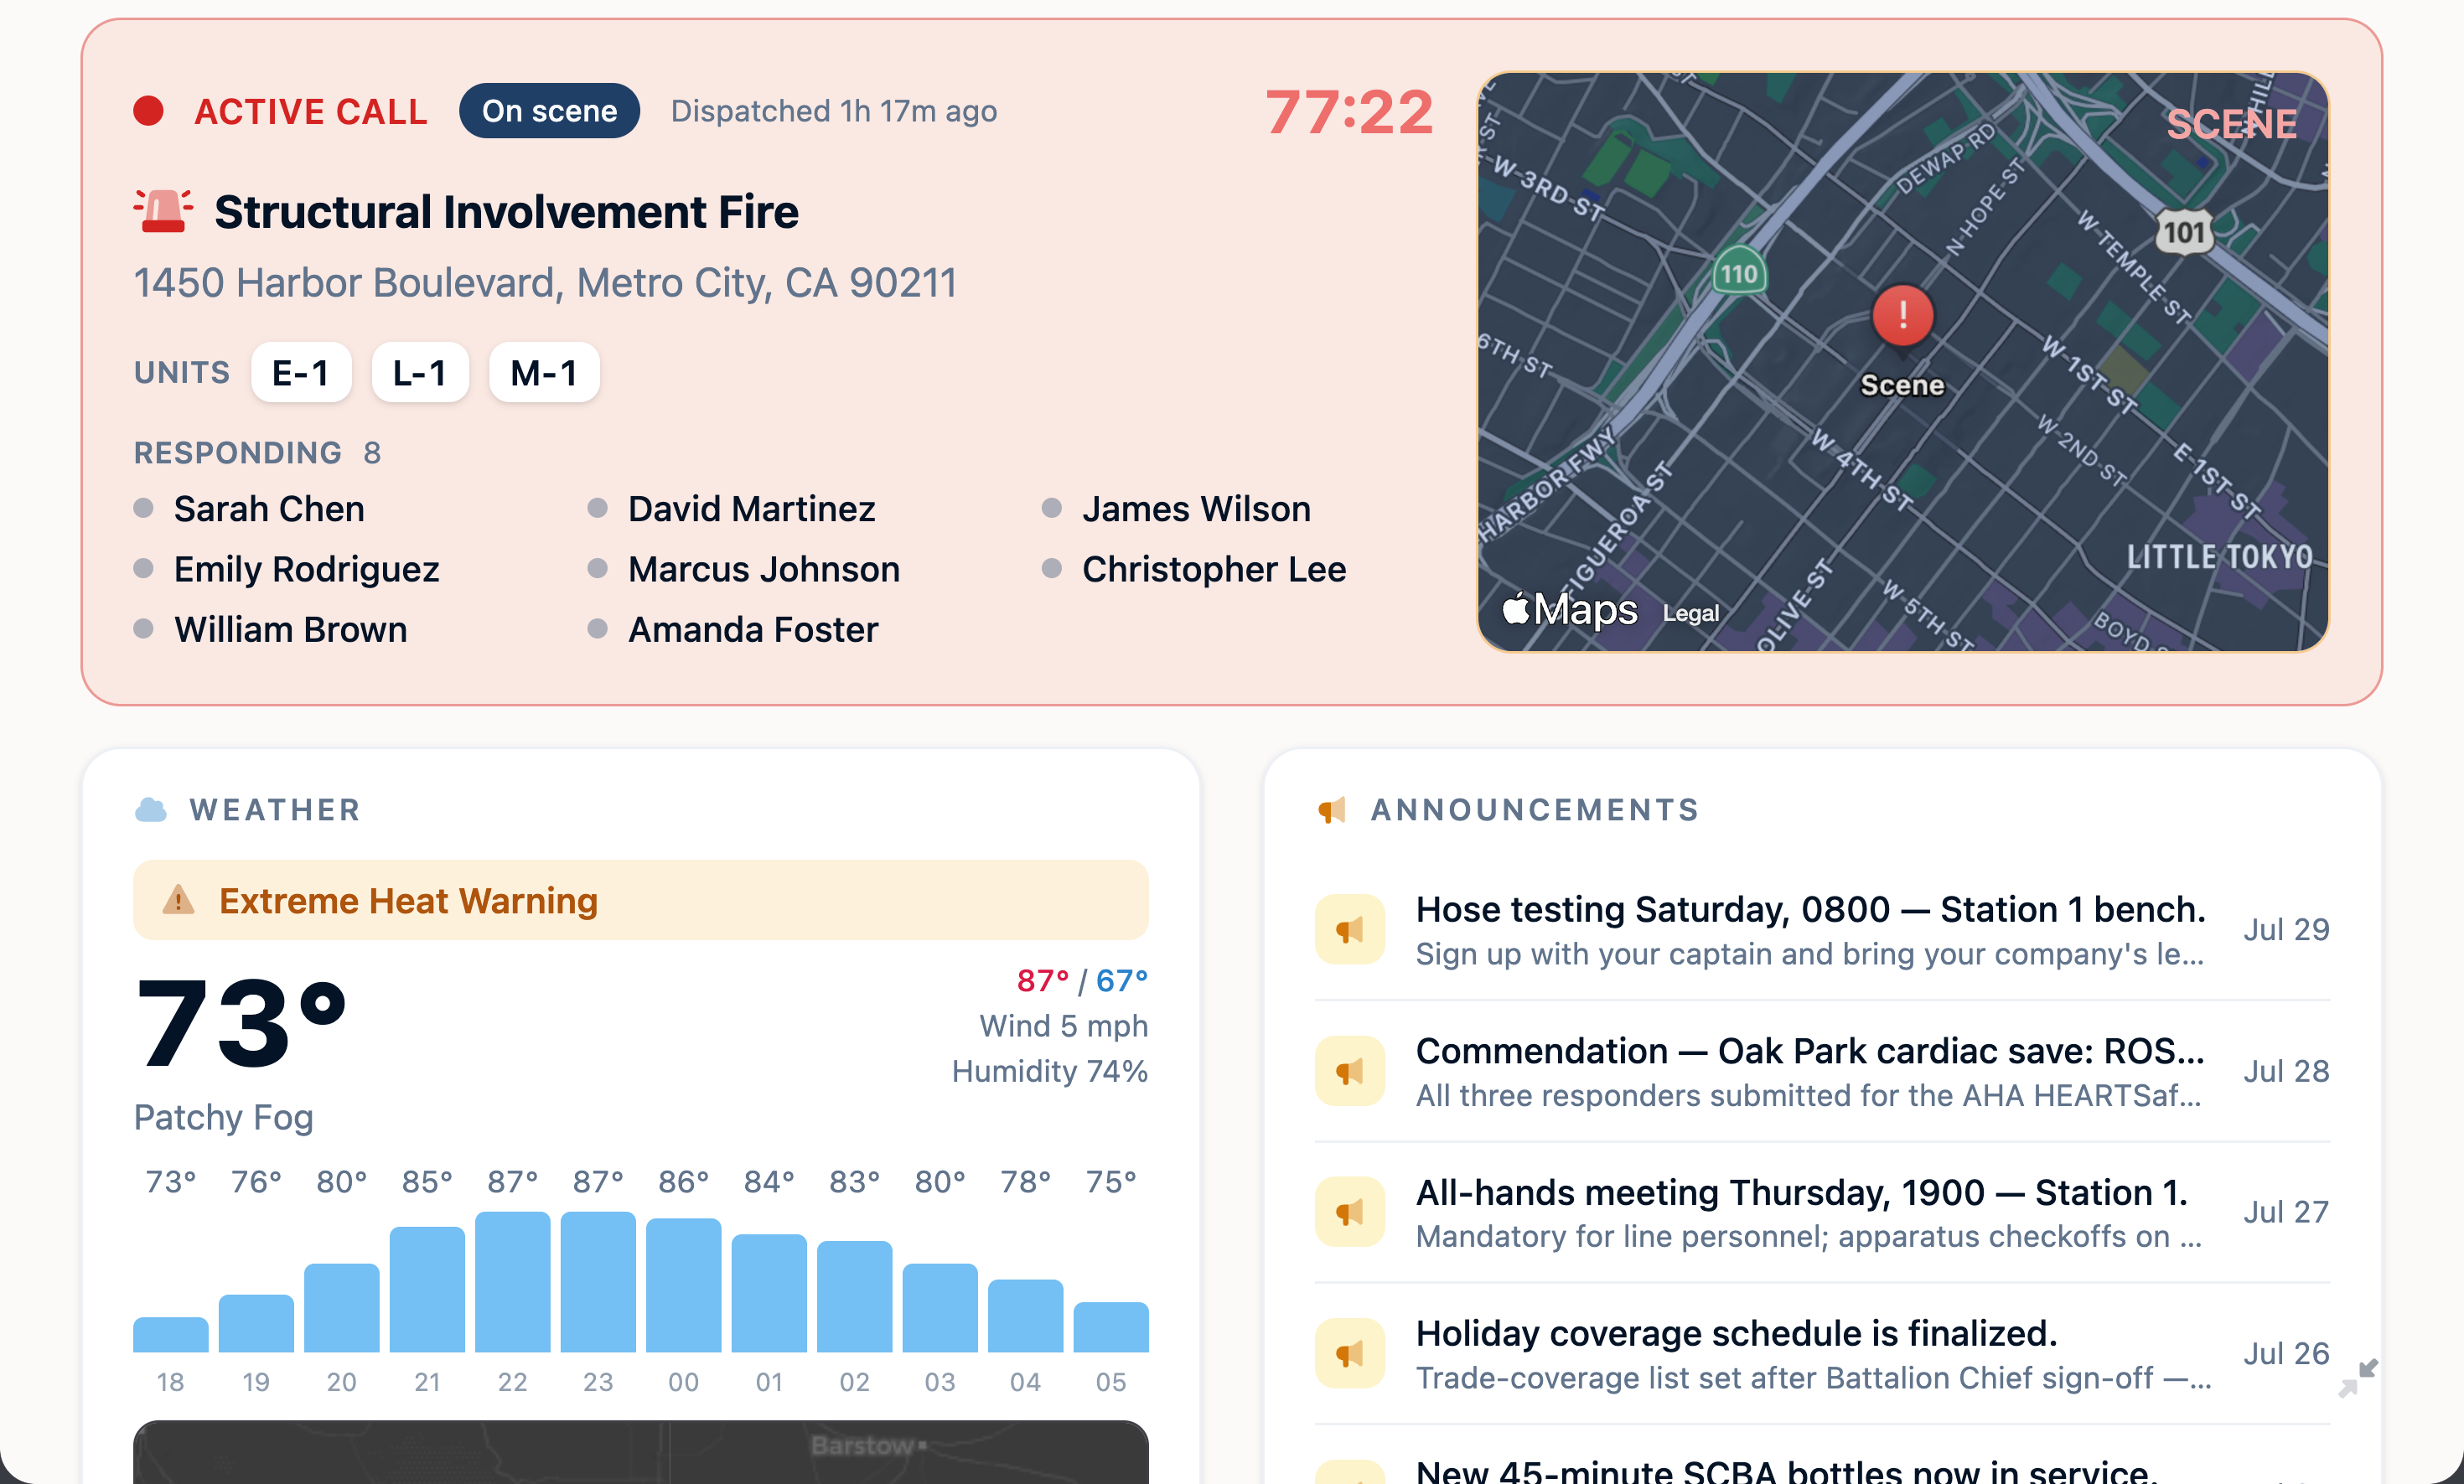
With one active response, the dashboard shows a detailed incident card and counts turnout time from dispatch.
In Display mode, a compact status strip remains pinned at the top while the widgets scroll underneath it. It reports the number of active incidents and responses in progress without presenting navigation controls on the unattended screen.
Leave Display mode when you need to open responding details or use the alert's expanded incident view. When several incidents are active, the expanded view uses a multi-incident grid.
The Station Board does not automatically open or edit an incident. It presents the authenticated incident information that the display account is allowed to read.
Modules and Permissions
If a widget is missing or shows an access error, confirm both the required data or module and the account's permission:
| Widget | Data or module needed | Recommended permission |
|---|---|---|
| Weather | Station coordinates | Read — Stations |
| Announcements | Log Books module | Read — Log Entries |
| Expiring certifications | Training module | Read — Training |
| Recent and active incidents | Incidents module | Read — Incidents |
| Upcoming training | Training module | Read — Training |
| Upcoming events | Department calendar; each layer's module (Events, Training, CRR, SOPs, Pre-Plans, Inventory, Hydrants) | Membership only — no extra read permission |
| On-duty personnel | Scheduling module | Read — Personnel |
| Apparatus tests | Apparatus records | Read — Apparatus |
| Rig check-offs | Check-Offs module | Read — Apparatus |
| Inventory compliance | Inventory module | Read — Inventory |
Owners and administrators can enable department modules from Department Settings and adjust the display member's access from the Members page.
Troubleshooting
The Display mode button is missing
Edit the dashboard, open Display mode in the edit toolbar, turn on Show display mode button, and save. The setting is stored separately for each display account.
Auto-scroll is enabled but the board does not move
Auto-scroll only moves when the dashboard is taller than the available screen. Add more widgets, use taller widget sizes, or reduce the browser's display scaling. Recent mouse, touch, wheel, or keyboard activity also pauses scrolling temporarily.
A widget is not available in the widget picker
Check that the widget's module is enabled for the department. Some widgets, including certifications, scheduling, inventory, and announcements, are hidden when their owning module is disabled. Upcoming events is the exception: it always appears, and disabled modules simply contribute no rows.
A widget shows unavailable or access denied
Review the dedicated display member's read permissions. Weather also needs usable coordinates on the station record so it can find the local forecast.
The board left fullscreen
Browsers and television operating systems can leave fullscreen after Escape, a remote-control gesture, an application switch, or a browser restart. Select Display mode again. For a permanently mounted screen, configure the device to reopen Command Established at startup.
Can I open the Station Board without signing in?
No. Station Board Display mode uses a normal authenticated dashboard account. There is no public board URL or secret share token. This keeps the display inside the department's normal membership and permission controls.
Frequently Asked Questions
I'm a station captain — how do I show the next two weeks of trainings and events on the day-room TV?
Sign in on the TV with the station's display account, open the Dashboard, select the edit button, then Add widget and add Upcoming events. Its defaults already do what you want: a 14-day look-ahead with the Events, Training, and CRR Events layers. Give it a large tile so most rows fit; the widget scrolls inside its tile when eight rows plus day headings run past the edge, so the last entries may need a scroll on a small tile. Select Save, then turn on Display mode as described above. Any event, training, or CRR event a member adds to the department calendar shows up on the board without touching the TV. Items added from the Calendar page's add button are work orders, which only appear if you add the Work Orders layer under Include (see the next question).
How do I include work-order due dates or SOP review deadlines?
While editing the dashboard, select Configure on the Upcoming events widget and, under Include, add Work Orders, SOP Reviews, or any of the other due-date layers (Pre-Plan Reviews, Inventory Due, Apparatus Due, Hydrant Due). Select Clear to show every layer the department has. These layers are off by default so the board reads as a schedule of things the crew shows up for, not a to-do list.
Which read permissions does the display account need?
The Upcoming events widget itself needs none beyond department membership: the calendar is available to any signed-in member, and layers are limited only by which modules the department has enabled. Read permissions still matter for the other widgets on the board (see the table above) and for opening a calendar row to its underlying record, which you would do from a normal signed-in session rather than the wall display.
Recommended Rollout
Start with one dedicated display account and a short list of high-signal widgets. Let the board run for a few shifts, then adjust the layout based on viewing distance and what members actually check.
For departments with multiple houses, create one account per screen. Each account retains its own layout and Display-mode settings, so an operations board at headquarters can coexist with a readiness board at another station.
Need Help?
If you need help choosing widgets or configuring a least-privilege display account, contact support.